Mastering ActiveResource in Ruby on Rails: Complete Guide with Examples
Written by
Hernan Orozco
Last updated on:
October 1, 2025
Written by
Last updated on:
October 1, 2025
In this tutorial, we will create a simple Ruby on Rails application that will connect to a local RESTful service using Active Resource.
Note: I will be using Ruby 2.6.5p114 and Rails 6.0.2.2
Overview
Active Resource is a wrapper for REST web services made in Ruby that can be used in Ruby on Rails. It allows you to map external resources to ActiveRecord-like Ruby objects. It needs a class/model to represent the resource and a site value that will contain the URI for the resource.
As you can see, the Postmodel inherits from ActiveResource::Baseand a sitevar was defined with an URI pointing to the external API.
p = Post.find 1p.title = "New Title"p.save
(ActiveResource Usage: find and update)
When you call the first line, Active Resource will perform a GET request to the site url to ask for the resource for the id 1 (https://api.uri.com/posts/1.json).The postobject will have the keys returned in the API response as properties of the model. This instance also includes settermethods to change the properties. When the `save` method is called, a PUT request will be sent to update the resource in the API.
Let's create a simple REST server!
Now that we know what Active Resource is we can set it up in our Rails application. However, we will need a RESTful service to demonstrate Active Resource.
Note: We can connect to any service (even the ones that are not RESTful), however, Active Resource will work best if the service meets the REST principles.
We’re going to use the JSON Server library to create a simple local service. Install the library globally in your system by running:
npm install -g json-server
I created a dataset for this tutorial to give our JSON server some seed data, which you can find on this Github Repo.
json-server --watch db.json
To start the server, run this command in the same path you have the db.json file:
A local REST server will be running on port 3000 and serving the data from the db.json.
Time to create our Rails app
Ok, now that we have a REST server running on port 3000, it’s time to create our Rails app. Run the following commands:
Active Resource should be added as a gem, so add this line to the Gemfile
gem 'activeresource
Then run bundle install again:
bundle install
Ok, now that we have the gem installed, let’s scaffold a User resource.
bundle exec rails g scaffold User name:string username:string email:string phone:string website:string
This will create a model, a controller, and views for users. Since we’re not planning to use ActiveRecord or our database for this app and we’re going to get the resource from our REST server, we should remove the auto-generated migration. Go to db/migrate and remove the #_create_users.rb file.
Next, let’s add the users index action as root. Go to config/routes.rb and add this line:
root to:'user#index'
Now, run the Rails server on a port other than 3000, since our REST server is using port 3000. Let’s choose 3001.
bundle exec rails s -p 3001
If you try to visit localhost:3001, you should get an error. This is because our User model is still inheriting from ActiveRecord and there is no users table. To use the user list from our REST server, change the User model to inherit from ActiveResource instead of ActiveRecord.
The user model that inherits from ApplicationRecord should now inherit from ActiveResource::Base. Additionally, we need to set up the public API url by adding a class variable called site that should match with our local service url. We also need to set theinclude_format_in_path config as false. This will avoid the .json at the end of all the requests. The user class should look like this:
Now, reload the page and you should get a view like this:
This list is loaded from our local REST server in port 3000. Pretty cool, huh? We don't need to add extra code to get the list directly from the server because ActiveResource is doing that for us.
Let’s add the gem, httplog, to the gemfile and run bundle install. This will allow us to log all HTTP requests performed in our app directly to the Rails log:
# Gemfilegem ‘httplog’
# Terminalbundle install
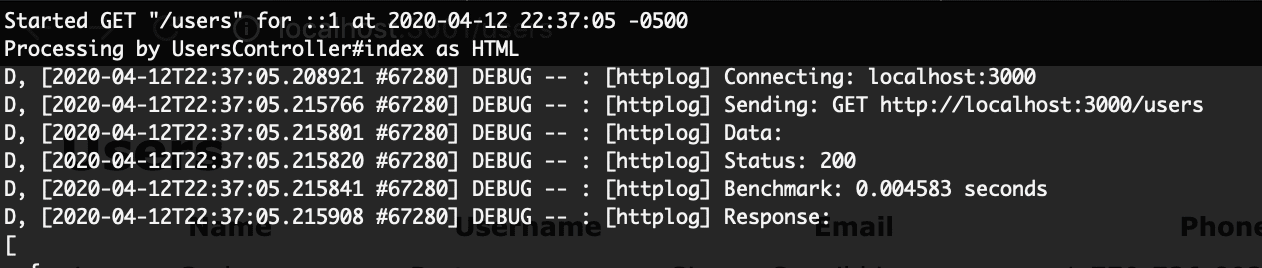
The scaffold generates an action in the index controller that calls the all method from the User class (User.all), which is a method from ActiveResource. Behind the scenes, it performs a GET request to our base site url using our name in plural, so the request is similar to this: GET http://localhost:3000/users
Note: By default, the resource name is the class name in plural. If your endpoint does not match the plural form of the model name, you can override it by calling the self.element_name method like this: self.element_name = "other_user_resource_name" inside the class.
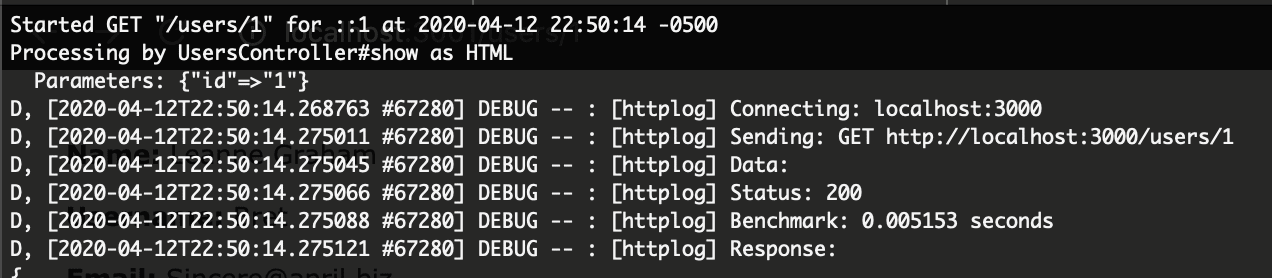
If we continue interacting with the page, we’ll notice that the show action works as well. It will perform a get request with the user id: GET http://localhost:3000/users/1
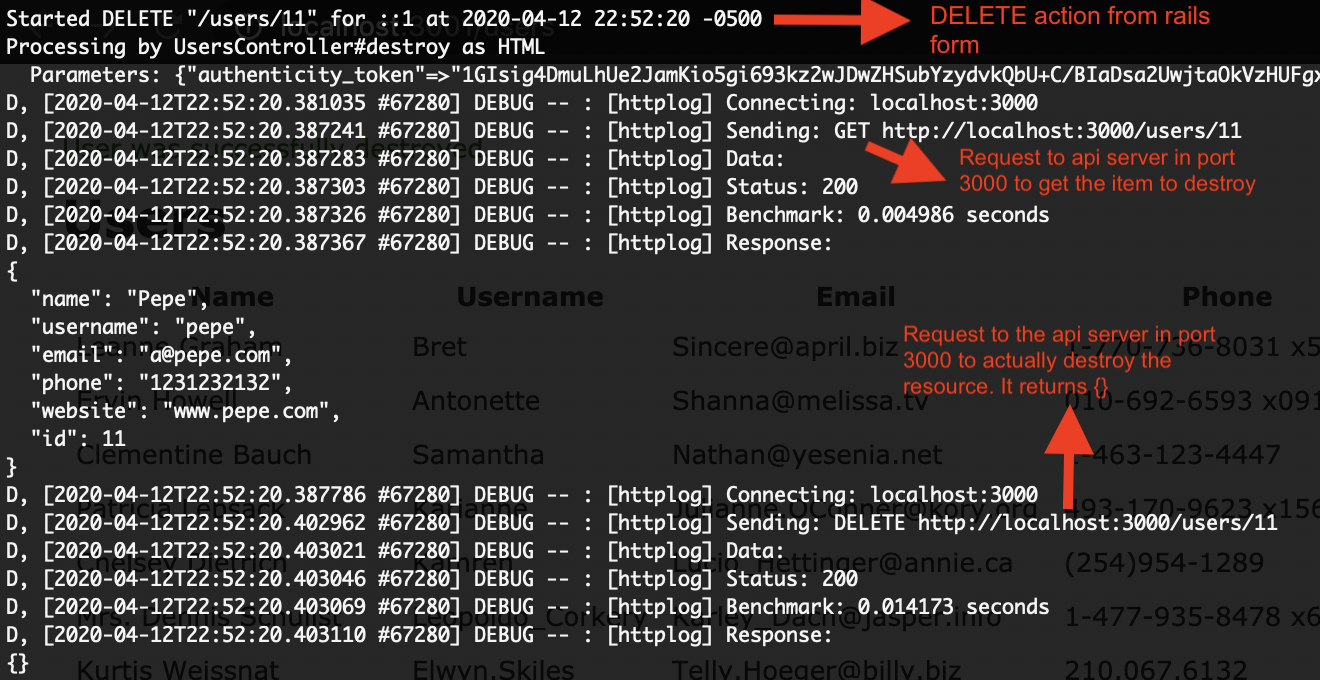
The destroy action will work, so you can test removing a user.Activeresource will perform a DELETE request to our REST server and the response will be an empty object `{}`
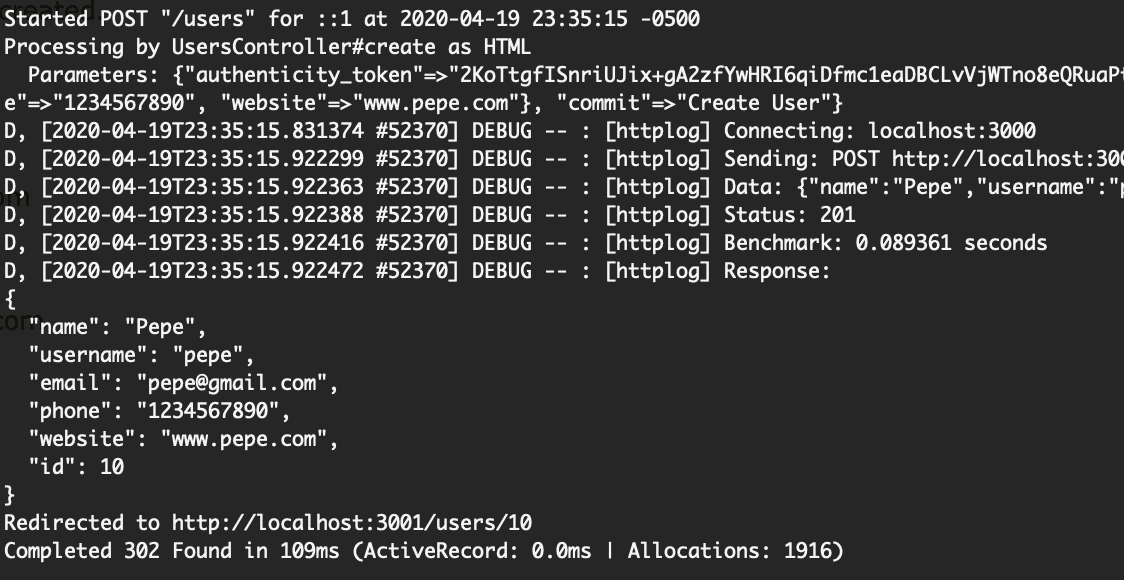
Now, let’s check the create action. Go to http://localhost:3001/users/new in the user index view and fill out the form. In the console, you will see something like this:
You can see that the form params were passed as a POST body to the REST server. Magic!
However, the update action is not going to work like the others. This is because Active Resource instances do not implement the “update” method, so we need to modify the update action in the user’s controller like this:
As you can see, we changed the “update” call for a “save” call, and we also set the user attributes in a line before that call. It’s important to include the resource id in the params, so Active Resource knows what’s going to be updated.
Add a relationship
Now that we have a single resource, let’s create a relationship for it. The resource name will be “Album.” Users can have many Albums, so add a link to the user show view to display all their Albums. Additionally, in that view, we should also be allowed to remove Albums.
Create an Album model that inherits from Active Resource. This model should also contain the same configuration as the user model.
Now, let’s add the relationship in the User model.
has_many :albums
Next, go to config/routes.rb and modify the user resource clause to match this:
resources :usersdo resources :albums, only: [:index, :destroy]
end
As you can see, I’m adding an index and destroy action inside the user resources. So we need to create an albums_controller.rb file in controllers and create the actions:
Now we need a view for the index action. First, we should add the link to the index action in the user show file, so add this to app/views/users/show.html.erb
Next, we should create an albums folder inside the views along with an index file. The file will be in this path: app/views/albums/index.html.erb and should contain this:
Ok, that should do it. You can now navigate to the user Albums list, see the Albums that belong to each user, and remove an Album
In the controller, when we set the Albums @albums = @user.albums, Active Resource is performing this call: http://localhost:3000/albums?user_id=1.
Conclusion
This is just a small demonstration showing some of the capabilities of Active Resource. It supports many more features and customizations, such as:
Custom JSON formats – we can define the way the active resource is going to map the resource
Add default headers to the requests
Error handling and validations
Timeouts
And many more...
I invite you to go to the official documentation and see all the things you can do with this amazing tool.
Note: this isn’t always the right tool for the job; it depends not only on the use case but also how the REST service was created. Sometimes it’s more complicated to configure Active Resource than build a custom wrapper, so only use this if it fits your use case. At FullStack Labs, we have Ruby on Rails developers ready to build any custom software you might need.
Check out the Github Repo for this tutorial to see the completed app.
ActiveResource is a Ruby library that acts as a bridge between Rails applications and RESTful web services. It makes it possible to treat external APIs like they were part of your own application, letting you create, read, update, and delete data as if it were stored locally.
How does ActiveResource work in Rails?
ActiveResource works by mapping Rails models to API endpoints. When you fetch a record, Rails sends a request to the API and turns the response into an object you can interact with. If you update or delete that object, ActiveResource automatically sends the right HTTP request back to the service.
What’s the difference between ActiveResource and ActiveRecord?
ActiveRecord connects Rails models to a database, while ActiveResource connects them to an external service. Instead of running queries against a database table, ActiveResource sends HTTP requests to an API and returns the data as if it were a local record.
Can ActiveResource handle relationships between resources?
Yes, ActiveResource can manage relationships like users having many albums. When set up, Rails can request related data from the API and display it within your application, just as if it were working with database-backed models.
When should I use ActiveResource in a Rails project?
ActiveResource is best when you’re building an application that relies heavily on a well-structured RESTful API and you want to save time writing custom code to connect with it. It may not be the right fit if the API doesn’t follow REST principles or requires special handling, in which case a custom solution can be more effective.
AI is changing software development.
The Engineer's AI-Enabled Development Handbook is your guide to incorporating AI into development processes for smoother, faster, and smarter development.
Enjoyed the article? Get new content delivered to your inbox.
Subscribe below and stay updated with the latest developer guides and industry insights.
Thank you! Your submission has been received!
Oops! Something went wrong while submitting the form.
We use cookies to provide our services, to allow us to better understand our audience, and to provide and serve personalized ads or content. By using our website, you consent to the terms of our Privacy Policy and our Cookie Policy, and the use of cookies, pixels, and other technology as described more fully therein
The GPC signal has been honored.
Thank you! Your submission has been received!
Oops! Something went wrong while submitting the form.
.svg)