Integrating Angular with Ruby on Rails using Webpacker: A Step-by-Step Guide
Written by
Bryan Villafane
Last updated on:
October 1, 2025
Written by
Last updated on:
October 1, 2025
In this Blog post we are going to learn the quickest way to integrate Angular 8 into a Ruby on Rails project.
We are going to use webpacker to manage app-like JavaScript modules in our Rails application. Webpacker is the fastest and easiest way to integrate any JavaScript framework that exists out there, that’s why that’s our go to solution.
In order to complete this tutorial, we should have already installed node, yarn, ruby and ruby on rails.
I am using RoR 5.2.4.1 and Ruby 2.6.2 for this tutorial + Angular 8.
Once finished, you can start writing a modern ES6-flavored Angular app right away.
Sqlite3 has a bug that can stop the server from running on a fresh Rails app. Thankfully, the fix is straightforward.
In the Gemfile we need to replace gem sqlite3 with gem sqlite3, ~> 1.3.0. Now let’s run bundle installonce again.
Now lets access our new project directory and let’s open our code in our favorite code editor. The first thing we noticed is the new javascript folder inside /app, that was added by webpacker and that’s the suggested place to start writing TypeScript code for our Angular app.
Let’s open our application.js file inside /packs and add these lines per recommendation from Webpacker:
Now let’s open our application layout file app/views/layouts/application.html.erb; in order to add our JavaScript pack(s) in our Rails views we are going to use the helper javascript_pack_tag, add the following line in that file, like this:
Basically, webpacker is going to compile every main directory inside the app/javascript folder into the packs folder (excluding the packs folder) resulting in a .js file, as we can see there is also another file inside packs, hello_angular.js; this file is the Javascript’s compiled version of the TypeScript code that is present inside app/javascript/hello_angular. So if we want to use the code that got compiled into the file hello_angular.js we should use javascript_pack_tag again to require it in the specific view we want.
We are going to add that later, for now let's create a quick scaffold.
rails g scaffold Blog title:string content:text && rake db:migrate
Now let’s open the rails console using rails c and create an example blog with the following line:
Blog.create(title: 'My first blog post', content: 'Lorem ipsum')
Create a new folder called blog inside app/javascript/hello_angular/app. Inside this new folder let’s create another folder called index, as you just notice we are going to fetch and show our list blogs.
Inside our new index folder let’s create three more file, these are gonna be called index.component.ts, index.component.html and html.d.ts, in our index.component.ts let’s add the basic structure for a TS component:
Here we are injecting the future blog service that we are going to create later, we use this service to fetch the list of blogs, we are going to use the blogsvariable to display blogs in our html file later.
In order to use HTML templates with Typescript and Angular we need to do the following things. Let’s add html-loader using yarn yarn add html-loader.
Let’s add this to html.d.ts, basically this will let us import html files into TS code.
Finally in the file config/webpacker.yml add this for the extensions list:
- .elm
- .coffee
- .html
Inside the blog folder let’s create two files, blog.class.ts and blog.service.ts
exportclassBlog{
constructor(public id: number, public title: string, public content: string) {}
}
We are here defining the structure of our blog class.
Now let’s define our function that will fetch and return a list of blogs, so we are going to communicate with our server. Add this to the blog service:
The <hello-angular></hello-angular> tag, is the selector specified on line number 4 on the file app/javascript/hello_angular/app/app.component.ts. This tag will pick up the code in our new component.
Finally, let’s create a simple routing system for our Angular app. We will need to add @angular/router using yarn yarn add @angular/router.
Let’s create a new file called app-routing.module.ts inside app/javascript/hello_angular/app and add this code:
Now let’s start our server application by running:
rails s
If we visit the url http://localhost:3000/blogs we can now see the list of blogs.
Finally, we have two options to compile our TypeScript code, on demand or upfront. By default our code is getting compiled on demand, that means we have to reload the page every time we make a change in our code. If we want to change this behavior we will need to open a new console tab and run:
./bin/webpack-dev-server
Now our TS code will be compiled upfront! By doing this we also have live reloading now, so no need to refresh the web page.
Now we’re going to show you some great Angular configs and tips for RoR applications as well as some Atom plugins to work with TypeScript.
Configs
Open the tsconfig.json file and tweak the configuration; this is necessary to access the latest stuff in the ECMAScript specification. To the array of lib,append es2019:
"lib": ["es6", "dom", "es2019"],
In the module, change es6 to esnext:
"module": "esnext",
Tips!
If we’re writing afeaturetest with Rspec, by default the code will be compiled every time we run it; however, this takes time and the waiting gets annoying. Instead, in the webpacker config file (config/webpacker.yml) we can update it to use the development compilation build of the angular code by doing this:
test:
<<: *defaultcompile: false # Compile test packs to a separate directory
public_output_path: packs
The downside of this approach is that we need the development build to be updated, but since we’re constantly working on the code, it should happen anyways.
Atom’s Plugins
All Atom’s packages can be installed by going to settings and then searching for them:
We start with atom-typescript, as it does not ship with any useful configuration/tools; the list of features can be found here.
In the next section, we’re going to configure and use tslint, so go ahead and install these plugins:
If we open an angular file and hit `save,` we’ll probably see some warnings/errors in the console.
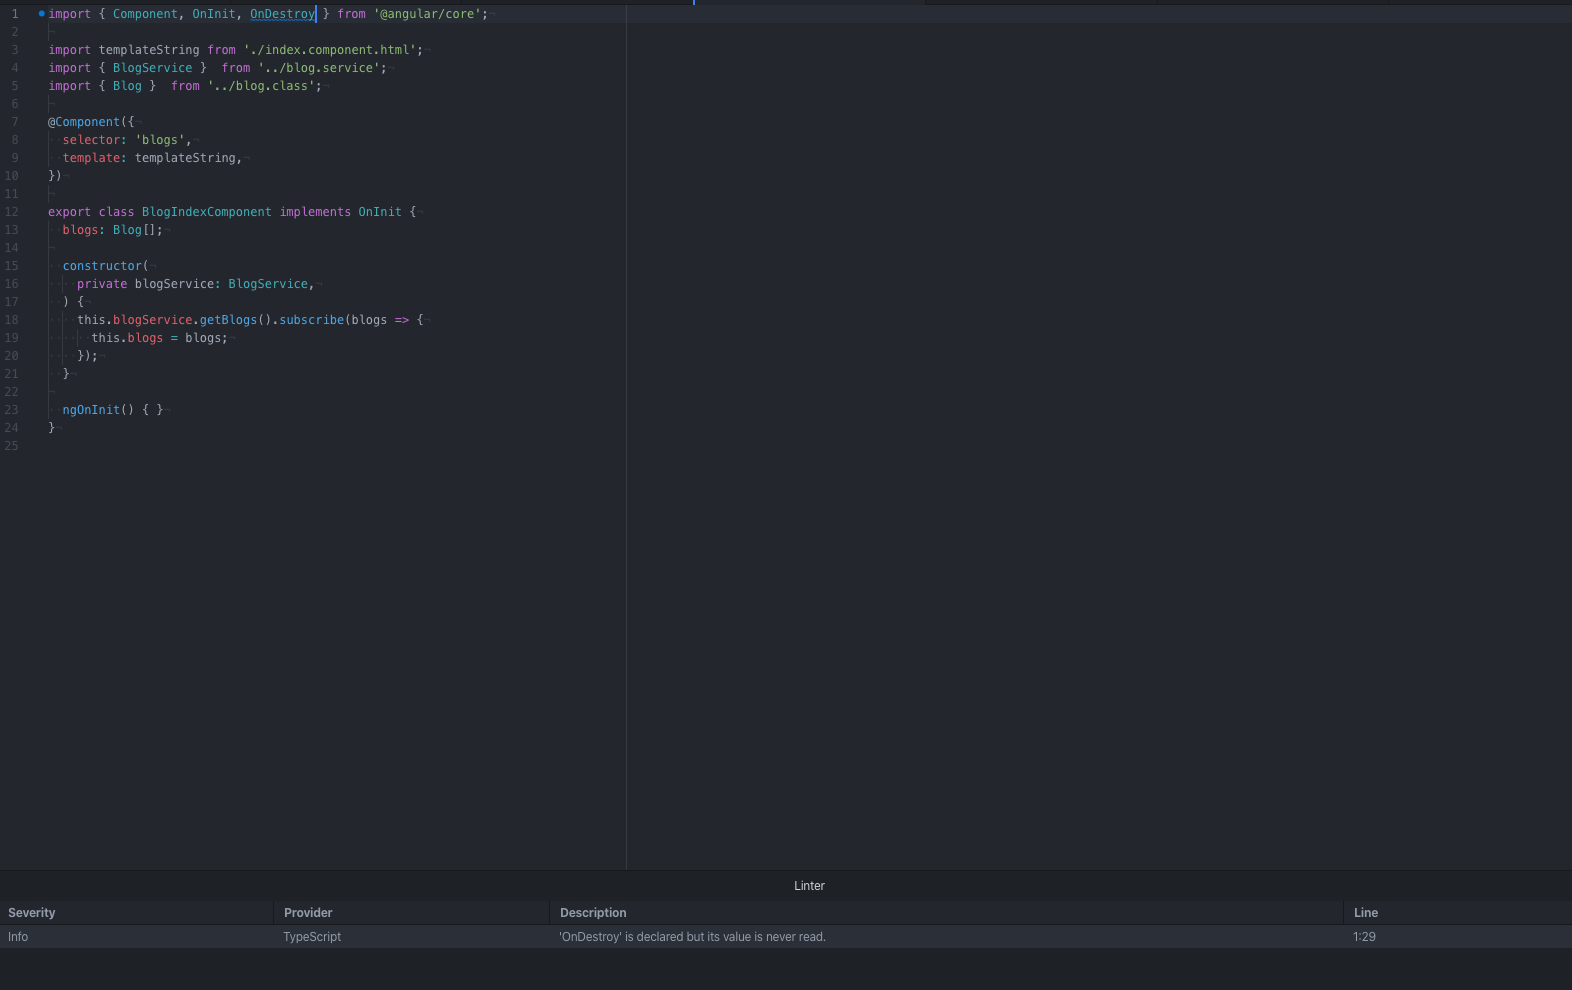
This is how the linter looks in action; in this example, it’s telling us that the interface OnDestroy was imported but is not being used.
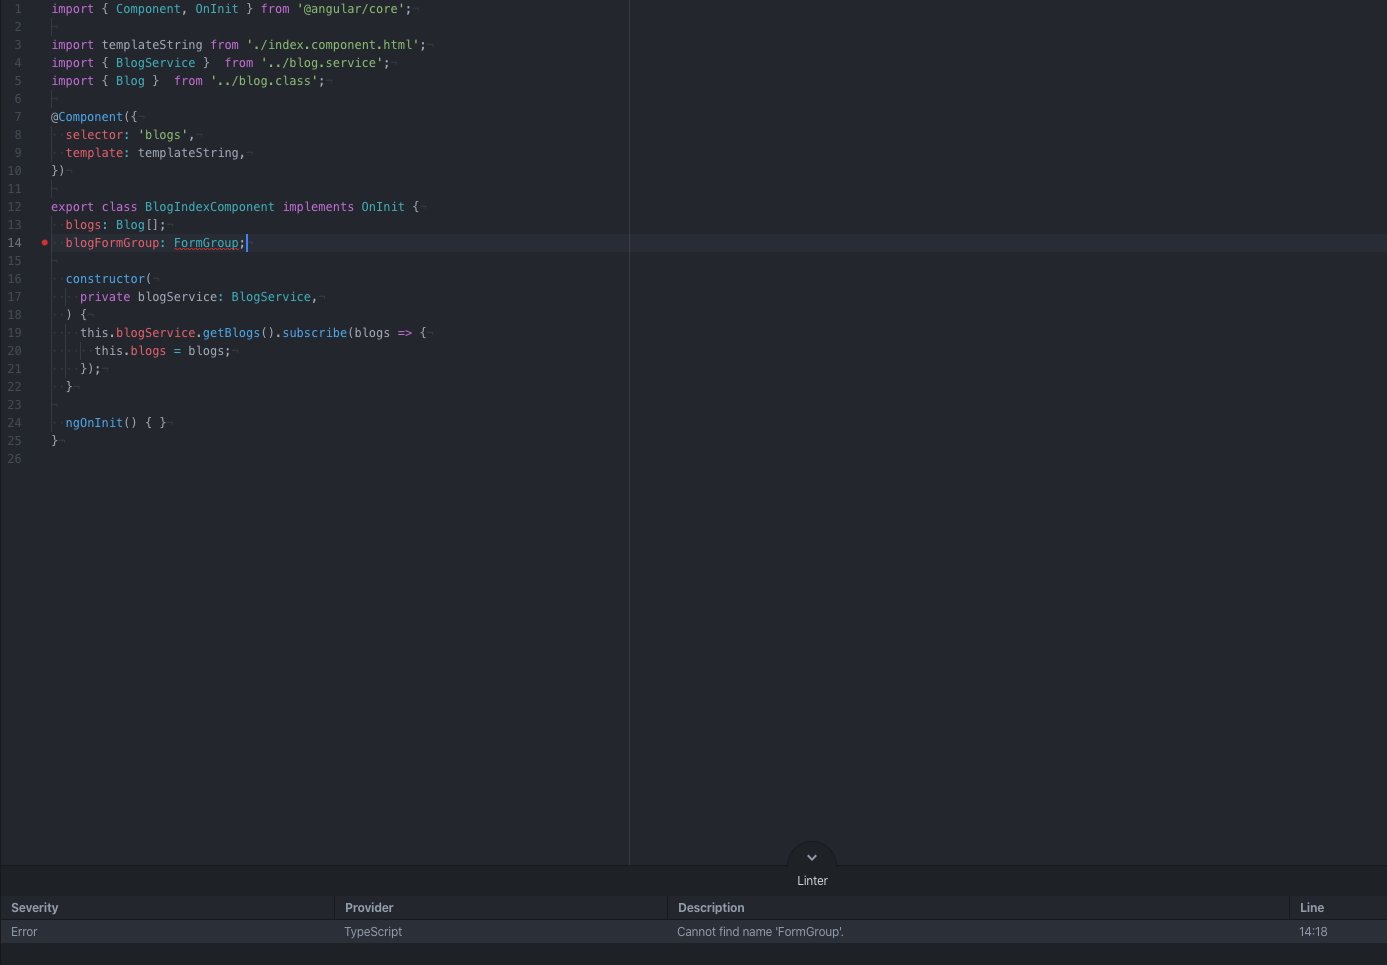
If we forget to import a module, this is the message we see:
As you can see, this is a necessary tool as it makes sure our final angular code is clean, readable, and good looking.
Bonus
If you want to see these beautiful file icons in Atom, you should install prettier-atom
I hope you enjoyed these tips and tricks. If you have some suggestions, please leave them in the comments.
Conclusion
Using techniques like what is listed above, we have had the opportunity to address our clients’ concerns and they love it! If you are interested in joining our team, please visit our Careers page.
What is the purpose of using Webpacker in a Rails project?
Webpacker allows Rails applications to manage modern JavaScript frameworks like Angular efficiently. It compiles ES6/TypeScript code, handles module bundling, and integrates JavaScript packs into Rails views seamlessly.
How do I set up Angular 8 in a Rails project?
You start by installing Webpacker in your Rails project, then run the Webpacker Angular installation commands. After that, you can write Angular code in the app/javascript directory and link it to Rails views using javascript_pack_tag.
How do I fetch and display data from Rails in Angular?
Create a service in Angular that uses HttpClient to make requests to Rails JSON endpoints. Then, inject the service into a component to fetch the data and display it in the HTML template using Angular directives like *ngFor.
How do I enable live TypeScript compilation and reloading?
By default, Rails compiles TypeScript on demand. To enable upfront compilation and live reloading, run ./bin/webpack-dev-server. This ensures changes in Angular code are immediately reflected without manual page refreshes.
What tools help maintain clean Angular code in a Rails project?
Using Atom plugins like atom-typescript and linters such as tslint, tslint-angular, and codelyzer ensures your Angular TypeScript code is consistent, readable, and error-free. Prettier-Atom can also be used for clean file formatting.
AI is changing software development.
The Engineer's AI-Enabled Development Handbook is your guide to incorporating AI into development processes for smoother, faster, and smarter development.
Enjoyed the article? Get new content delivered to your inbox.
Subscribe below and stay updated with the latest developer guides and industry insights.
Thank you! Your submission has been received!
Oops! Something went wrong while submitting the form.
We use cookies to provide our services, to allow us to better understand our audience, and to provide and serve personalized ads or content. By using our website, you consent to the terms of our Privacy Policy and our Cookie Policy, and the use of cookies, pixels, and other technology as described more fully therein
.svg)