Zendesk provides a system for tracking and solving customer support tickets. Connecting Zendesk to your slack channel allows your team to receive instant alerts about tickets and quickly create a plan to resolve them. This tutorial will guide you through the 4 steps required to integrate Zendesk into Slack.
These steps, in order, are:
Setting up Incoming Hook in Slack Channel.
Setting up Outgoing HTTP Zendesk Integration.
Setting up a Zendesk Trigger for Sending Slack Notifications.
Testing the Integration.
Setting up an Incoming Hook on the Slack Channel.
Go to the Create Slack Webhook page to start the process and log in to your organization if you have not logged in already. Next, select the Channel that you want the notifications to go to. In this case, I am going to target my personal channel to receive notifications. Click on ‘Add Incoming WebHooks integration’ after selecting the channel.
Once the webhook is ready, copy the Webhook URL for use in the next steps.
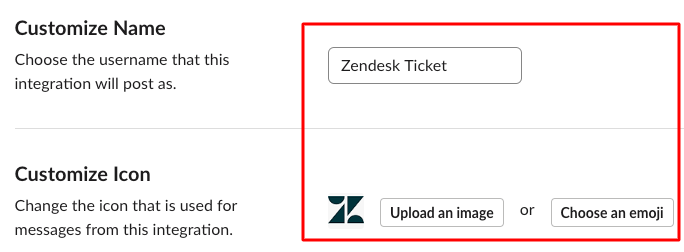
In the ‘Integration Settings’ section, you can customize the title and logo for the hook to make it more memorable.
When you are done customizing the webhook, click on the ‘Save Settings’ button at the end of the page and your webhook is ready to use.
Setting Up Outgoing HTTP Zendesk Integration
First, go to your organization’s page and navigate to the Extensions page through Support Admin/Settings/Extensions. The URL should look something like this:
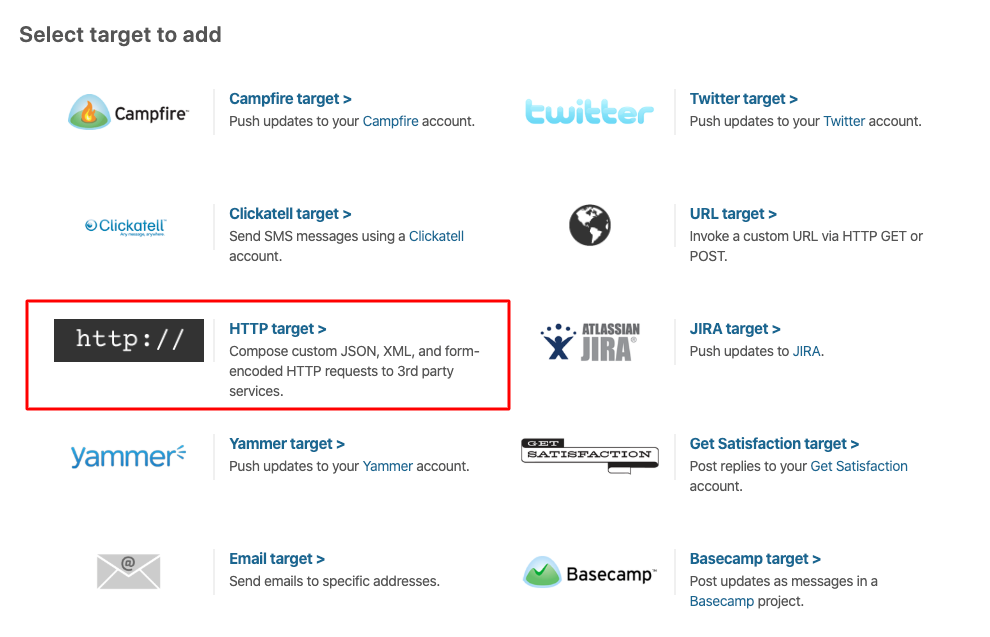
Click on the add target button to start creating a new target that can post messages to Slack.
Select HTTP Target option from different types of targets.
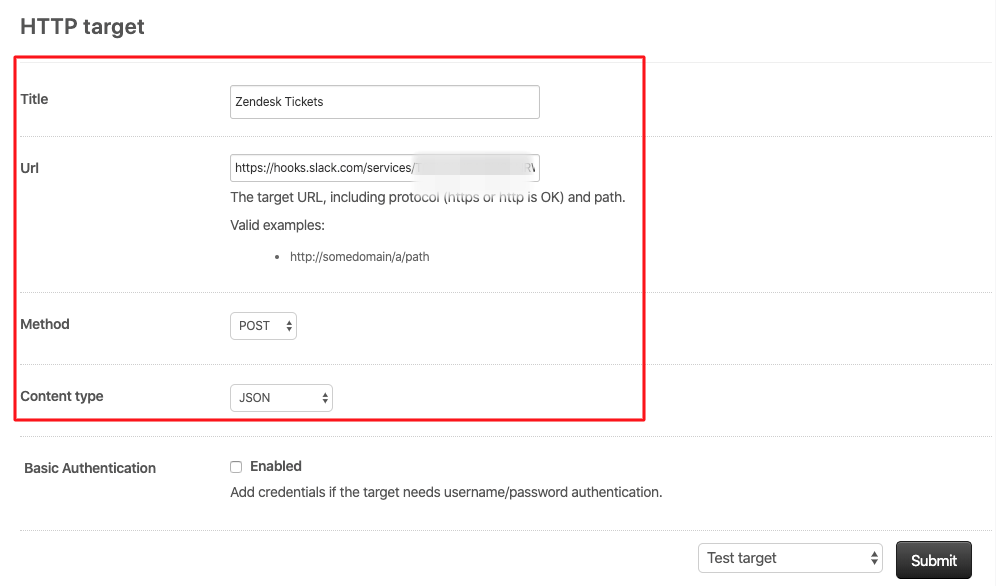
Add an identifying title (e.g. Zendesk Tickets) on the HTTP target form. The URL on the form should be the Webhook URL created in the step above. Select POST as the method and JSON for the content type. Next, select Create target in the menu next to the Submit button. Finally, click Submit to create the target.
The HTTP target is now ready to use. Now we need to create a trigger and send data to the target.
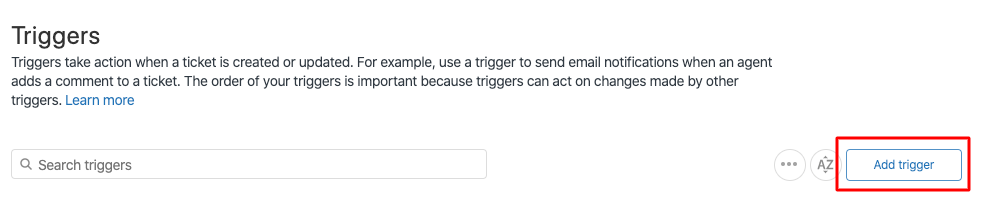
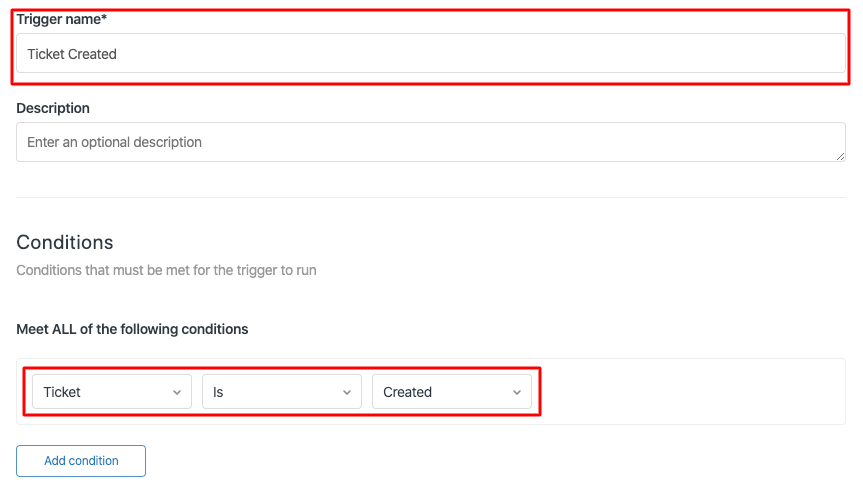
Setting Up a Zendesk Trigger for Sending Slack Notifications
Go to the Triggers page in Zendesk, which should be under Admin/Business Rules/Triggers. The URL should look like this:
Add any meaningful trigger name (e.g. Ticket Created). Add condition(s) for the trigger (e.g. Ticket Is Created).
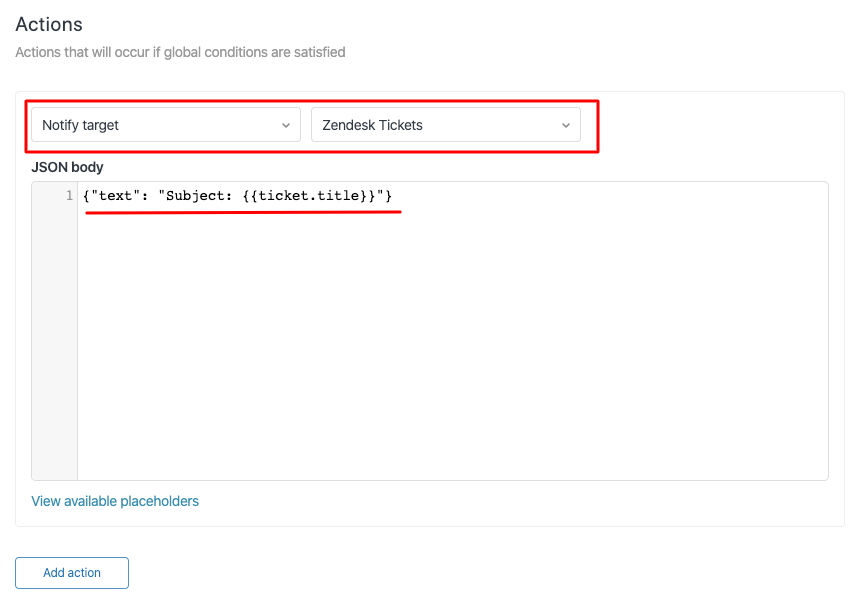
Add Actions for the trigger. Select action as Notify Target and target as Zendesk Ticket (or whatever name you have used for the HTTP target). Since the goal here is to send ticket data to Slack, we will add the ticket title to the JSON body as shown below.
Click the Create button to get the trigger ready.
You can add more data to the message if you want. The details of available parameters can be checked by clicking on View available placeholders link.
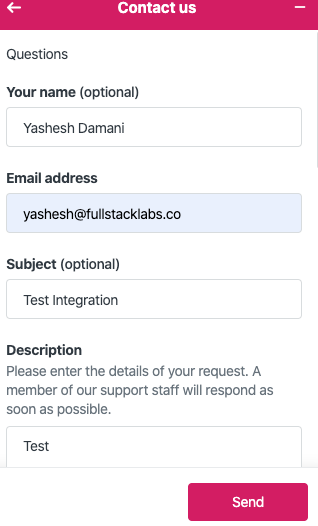
Testing the Integration
Finally, we can test the integration by creating a ticket using the Zendesk widget in the Contact Us section.
Clicking on Send should trigger a notification to the Slack channel, which should look as follows.
The integration is now complete and you will receive notifications about Zendesk tickets in the Slack channel you chose.
Conclusion
Using techniques like what is listed above, we have had the opportunity to address our clients’ concerns and they love it! If you are interested in joining our team, please visit our Careers page.
What is the purpose of integrating Zendesk with Slack?
Integrating Zendesk with Slack allows your team to receive instant alerts about customer support tickets and quickly create a plan to resolve them.
How do I set up an incoming webhook in Slack for Zendesk notifications?
You create a Slack webhook by visiting the Slack Webhook page, selecting a channel, adding the integration, and copying the generated Webhook URL for later use. You can also customize the webhook’s title and logo before saving it.
How do I configure Zendesk to send data to Slack?
In Zendesk, go to the Extensions page, create a new HTTP target using the Slack Webhook URL, choose POST as the method, and JSON as the content type. After creating the target, you can link it to a trigger.
How do I create a Zendesk trigger for Slack notifications?
Go to Zendesk’s Triggers page, add a new trigger with a meaningful name, set conditions (like "Ticket Is Created"), and select an action to notify the HTTP target you created. You can include ticket details in the JSON body of the notification.
How can I test that the integration is working?
Create a test ticket using the Zendesk widget on your site or app. When submitted, a notification should appear in the Slack channel you specified, confirming the integration is functional.
AI is changing software development.
The Engineer's AI-Enabled Development Handbook is your guide to incorporating AI into development processes for smoother, faster, and smarter development.
Enjoyed the article? Get new content delivered to your inbox.
Subscribe below and stay updated with the latest developer guides and industry insights.
Thank you! Your submission has been received!
Oops! Something went wrong while submitting the form.
We use cookies to provide our services, to allow us to better understand our audience, and to provide and serve personalized ads or content. By using our website, you consent to the terms of our Privacy Policy and our Cookie Policy, and the use of cookies, pixels, and other technology as described more fully therein
The GPC signal has been honored.
Thank you! Your submission has been received!
Oops! Something went wrong while submitting the form.
.svg)